
How to make a Switch Tag
NFC Tag Series: Programming an NFC Tag Part 3 – Making a Switch Tag
How is everyone doing so far? Programming NFC tags are pretty easy right? So far, we have dealt with the simplest application usage of a tag.
In our previous example, we have been able to make a tag that allows you to start your Bluetooth radio. Of course, once you are done, you either have to turn off Bluetooth manually or use a different tag which is programmed to turn off the Bluetooth connection.
That is actually a misconception. Tags can actually do two things for you thanks to more complicated launchers such as the NFC Task Launcher which was introduced in part 1 of this series. Today, we are going to learn how to make a tag that actually switches your Wi-Fi connection on and off.
Making a Wi-Fi on and off switch task on one tag
For the sake of this tutorial, the NFC Task Launcher app will be used. Please download the app from the Play Store.
 As we run the app, you will be taken to the familiar screen that we used back in the first part of this programming tutorial. Go ahead and tap on the + icon on the upper right of the app. This will take you to a list of possible tags to make. For this part of the tutorial, please select “New Switch”
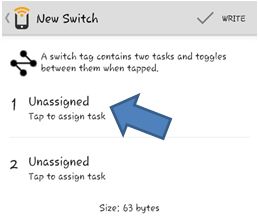 From here, you would see that there are two slots available for you to enter actions. This is because you chose a switch. Basically, when the tag is done, your tag will have two actions programmed into it. The first time it is tapped on the phone, it will execute the first action. The second tap executes the second action.
From here, tap on the “1 Unassigned” option.
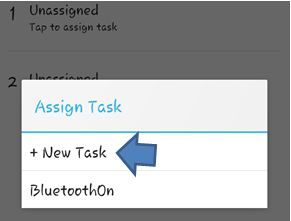 A popup should display on the screen now, giving you a few options. The first option, “+ New Task” is what we need to use right now.
This Popup will also show the recent list of commands that you have previously programmed. As you can see, we find the BluetoothOn action we programmed back in Part 1 as a recent program in the list.
 You will then be greeted by a familiar page. Here we will need to specify what action you would like to be performed when the tag is used for the first time.
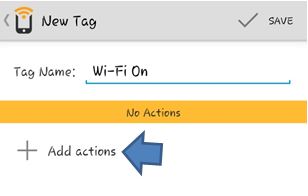
From here, simply choose “Add Actions”
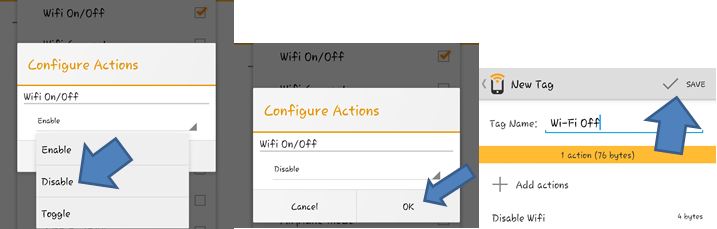
You will be given an extensive list of actions that you can program for your tag. For now, let’s keep our eyes focused on the “Wireless & Networks” list of options, more specifically, the “Wifi On/Off” option. Tick that option and choose “Next”
You would be treated to a popup showing you a choice of what to do with your Wi-Fi radio. There are three options right now. You have Enable, Disable, and toggle. Since our first switch is supposed to enable the Wi-Fi radio, we will choose “Enable”, and then choose “Ok”. After that, simply click “save” on the upper right of the page.
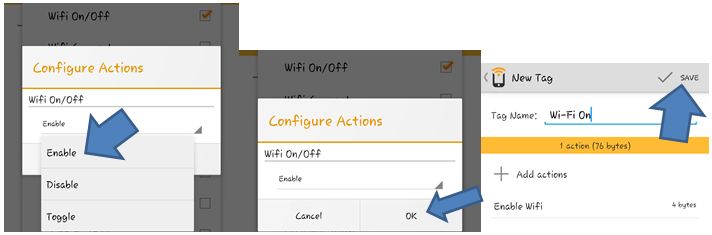
 The final page should look like the one on the right. The first task label is set as the action for 1. Congratulations! We have successfully set the first action.
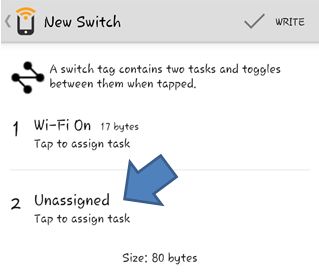
Now, we will set a second action which will turn the Wi-Fi Connection off after tapping the tag a second time.
To do that, just choose the “2 Unassigned” option from the list.
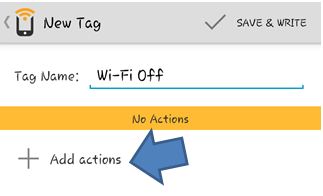 You should find yourself in a similar page where you write the label of the action you will set. Just enter whatever label works for you, but for clarity, I wrote Wi-Fi off. Go ahead and choose the “+ add actions” option.
From here, the steps are already pretty familiar for you. Simply choose the same options as earlier which “Wireless & Networks”, “Wifi On/Off”, and then “Next”
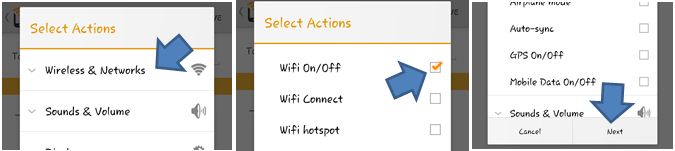
From here, you would need to choose “Disable” to so that when the tag is tapped, the Wi-Fi will be turned off. After that, choose “Ok” then “Save”.
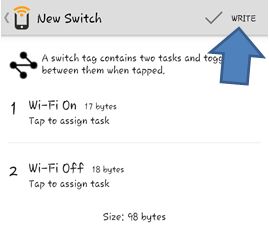 So now, we find ourselves back into the switch screen. You will now notice that the actions you have created are set on 1 and 2 respectively.
This means that the first tap will turn on the Wi-Fi, while the second tap will turn off the Wi-Fi. You will also notice the amount of space the action requires for it to be saved successfully.
From here, simply tap on “Write” to write the task on your NFC Tag.
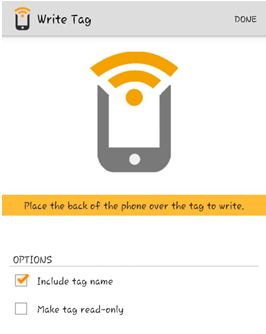 When on this page, all you need to do is tap the NFC tag to the NFC chip found usually at the back of your device.
Take note that this process automatically overwrites whatever is currently stored on a non-write protected tag, so make sure that you are not deleting an important tag.
Once done, a confirmation message will appear and you are done.
Testing your tag
To test your tag, simply exit the app or if you want to make sure it works even if the app has never been opened, simply restart your smartphone. Once you are ready, tap the tag on device and the first task will appear. Tap it a second time and the second task will take effect. Tag it a third time and the first task will again take effect, and so on.
It would be easy to tell which action was taken since the app does display a notification indicating which action was taken when tagged.

Check out the other topics of this series:
NFC Tag Series: Introduction to NFC
NFC Tag Series: Which NFC Tag to get?
NFC Tag Series: Programming an NFC Tag Part 1: Tags that need Launchers
NFC Tag Series: Programming an NFC Tag Part 2: Tags that don’t need Launchers


