

Troubleshooting tips: Squash bugs on Android – Extreme
On the most extreme of cases, your phone is so messed up that it is no longer possible to fix using all of the other methods combined. In this issue of Troubleshooting Tips, we will talk about the most extreme methods of debugging your Android device.
Take note that the methods described here are only done if all else fails, and is not recommended if there are other methods you have not yet tried. Some of these procedures could potentially brick your device if not properly done.
Something to take note of all the methods described here is that you better make sure you keep the battery at least 70% up. For good measure, keep it at 100%. All of these methods leave your phone unable to charge and operate for a while, which could spell even more disaster than they fix if interrupted.
Factory Reset (Reformat)
This procedure wipes all of your data and restores the phone to its original, out-of-the-box state. This means that all of your account data and everything stored within the internal memory of the device is wiped out and you start over from scratch. This includes corrupt memory and system data which may be the root of your current issue.
Make sure to back up any vital data that you may have kept in the internal memory before doing this.
There are 3 methods to perform a factory reset.
Official Method (Settings)
The official method of doing a factory reset requires you to navigate to your settings app. There, you should look thorough either the “Privacy”, “Security”, or “Back up and reset” settings. Depending on your phone model, skin and version of Android, the location of the “Factory Data Reset” sub option may vary.
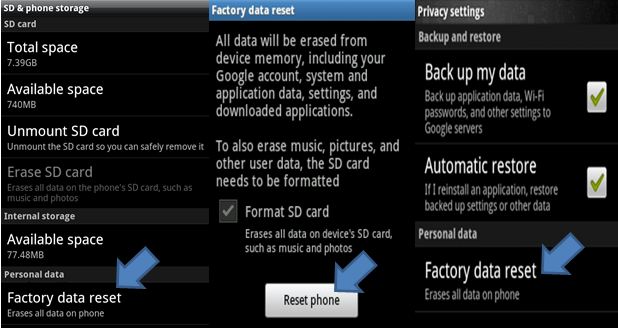
Simply Choose the “Factory Data Reset” and confirm that you understand what you are about to do will clear all data from the internal memory. After confirming, the phone will go through a short process of wiping all of the data and restoring the original settings. You are unable to use your phone at this time.
Factory Code Hard Reset Method
 This method involves using Android’s manual codes, also called “Factory Codes”, “Service Codes” or “Secret Codes” to reset your data. This has been involved in a security flaw before, where loading a website on a Samsung phone forces the code on your dialer which effectively reformats the phone using the code.
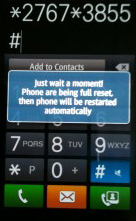
The code involved here is: *2767*3855#
To use this code, you have to enter it in your dialer application. Enter the digits one by one in the exact order they are placed above. Take not that on most phones, this code automatically executes after you enter the last digit. There would be no confirmation dialog, so be careful that you only enter this if you are sure you want to reformat your phone.
This is not much different from the official method, but is a lot easier to use if you find yourself lost and unable to locate the official “Factory Data Reset” option in your settings list.
Recovery Method
The recovery method is the most advanced, most thorough, and safest method of performing a factory reset. This is the only advisable method of doing a factory reset if you are using a custom ROM or a custom Recovery menu.
We’ve already talked about how to get to your recovery menu on the “Advanced” issue of this guide.
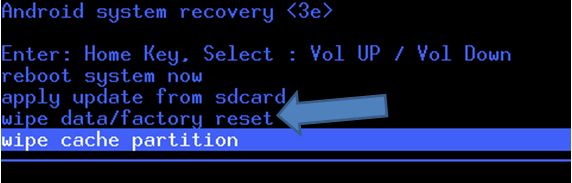
Once on the recovery menu, simply select and confirm the “Wipe Data/Factory Reset” option. It will go though some prompts for a shot while. Once complete, you will find yourself back on the recovery menu. Reboot your phone to complete the process.
Reinstalling Android
 When you are using ROMs other than the one intended for your phone and region, you may encounter bugs not because of faulty applications. It may indeed be the fault of the entire operating system that you have installed.
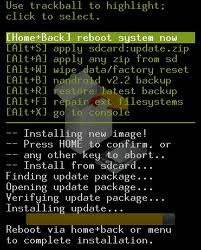
Flashing ROMs is a very dangerous yet highly rewarding practice. This allows you to fix any issue that is related to the operating system, tweak the performance to match your preference, and even get that little feature that you have been dying to have but your manufacturer won’t let you.
First of all, make sure to READ carefully and FOLLOW the instructions to the letter. That will help you install the ROM properly.
Still, the risks include a faulty installation. When something goes wrong, it can effectively brick your phone, or simply exhibit lots of bugs when the ROM boots up.
The best way to deal with situations where a factory reset has not solved the problem is to reinstall the entire ROM itself. By reinstalling the ROM at least 2 times, you are less likely to be a victim of an installation bug.
Of course, the method of reinstalling ROMs is too vast a topic to be covered by this mini-series. If you want a mini tutorial of any of the things we discussed here specific for your device, do drop by the comments section and leave a request.


