
Flashing Photosphere on a non Nexus Device
Google’s Android operating system has come a long way. Their latest version, Jelly Bean is the most feature-packed version of Android yet. One of the most impressive features of Jelly Bean in 4.2.x is the new and improved camera and gallery.
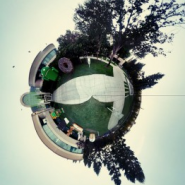
In 4.2.x versions of Android, which is still only available to Nexus device at the moment, features the next step in taking panoramic photos. Rather than taking a flat panorama, your smartphone can now take a “Photosphere” or a single photo which is able to depict a 360 degree spherical view of your surroundings.
If you have ever used Google Map’s Street View function, then you should be familiar with the end product of a Photosphere. You can see the entire surrounding area from a single point in space. It used to take complicated machinery to make a photosphere, but now, they made the process possible with smartphones.
Unfortunately, only Nexus devices have access to this feature officially as of the moment since only Nexus devices have access to Jelly Bean 4.2. Of course, that doesn’t mean your smartphone can’t make a photosphere. After all, we are modders and rooters now, and we will mod our device to be able to take these fantastic photos.
Requirements
Of course, not just anyone can get Photosphere. There are two major requirements apart from the camera for your phone to be able to use it. First and foremost, it needs motion sensor. The second requirement that a lot of older phones don’t have is a gyroscope. Also, it is recommended that you have a smartphone with Jelly Bean installed, but it has been reported to work with Ice Cream Sandwich builds as well.
Install a Custom Recovery
The first thing on your to do list should be to install a custom recovery. At this point, you may or may not have a custom recovery already installed, but chances are, if you are running a customized ROM, you are likely to already have a custom recovery. If not, then it is easy enough to install one depending on your device. I am not going to go into detail here, but you may check our other posts about installing a custom recovery.
Download the Flashable Zip file
The reason you are going to need a custom recovery is because we will be flashing a custom file which will install the apps we need for this to work. Since it is highly unlikely your non-Nexus smartphone will have a stable Jelly Bean 4.2 ROM at this point, you can simply opt to install the new camera and gallery found on Jelly Bean 4.2.
The download file is here:
This file is not affiliated with the site, credits due to the uploader, MariusOX.
Just download this file and keep it in your memory card for now, or if your smartphone does not support an external memory card, keep the file at the root of your internal SD.
Installation
To install the 4.2 camera and gallery to your smartphone, you need to boot your device in recovery mode. The process is different depending on the make and model of your smartphone, so please consult your manual for individual instructions.

Once in recovery mode, you should now find the option that says “install zip from sdcard” or “install zip from external sd card” in cases where the file is kept in the external memory card. Choose the ZIP file manually and accept the installation.
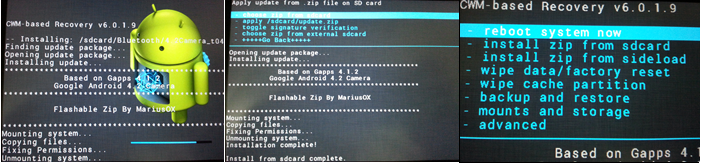
Once the install is complete, reboot your device. Once the OS has completely loaded, take a look at your apps list. There should now be two different camera apps and two different gallery apps in your app list.
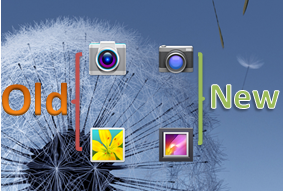
For your own convenience, keep these apps separated so you know which app you are launching. Depending on how your OS is themed, the icons may look exactly the same. You will immediately notice the difference when you launch the apps.
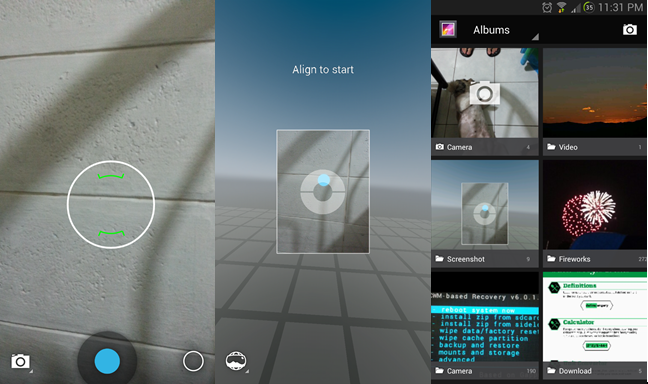
The new camera and gallery apps are exactly the same camera and gallery used by Nexus devices on Jelly Bean 4.2. The camera will allow you to take the Photospheres while the gallery will allow you to manipulate and view the photosphere.
Setting Up
Now that you have the necessary tools installed, you need to make sure you are properly set up to use it. No one really knows why, but it seems that Nexus camera and gallery tends to crash when your smartphone is set with a different language apart from US English. If you use a different language, you have to change the settings to US English before launching the camera application or gallery application.
Now that you are all set up, you can now start taking Photospheres using the new camera application on your device! Be sure to share your Photospheres on Google Plus which is currently the only social network that displays these photos as intended.


Thanks a million!